
搜索到
37
篇与
的结果
-
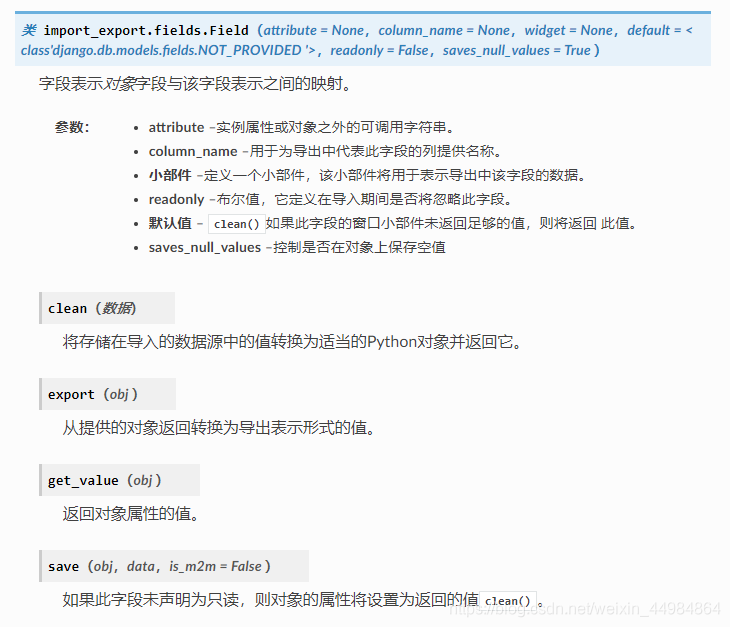
 django ImportExportModelAdmin自定义导出数据 官方文档:django-import-exportdjango 导出数据到excel借助官方文档的一些数据进行理解:class Author(models.Model): name = models.CharField(max_length=100) def __str__(self): return self.name class Category(models.Model): name = models.CharField(max_length=100) def __str__(self): return self.name class Book(models.Model): name = models.CharField('Book name', max_length=100) author = models.ForeignKey(Author, blank=True, null=True) author_email = models.EmailField('Author email', max_length=75, blank=True) imported = models.BooleanField(default=False) published = models.DateField('Published', blank=True, null=True) price = models.DecimalField(max_digits=10, decimal_places=2, null=True, blank=True) categories = models.ManyToManyField(Category, blank=True) def __str__(self): return self.name创建导入或导出的资源from import_export import resources from core.models import Book class BookResource(resources.ModelResource): class Meta: model = Book # 要影响哪些模型字段将包含在导入导出的资源中,请使用fields(自定义)选项将字段列入白名单 fields = ('id', 'name', 'price',) # 或将exclude(自定义)字段列入黑名单的选项 exclude = ('imported', ) # export_order(自定义) 选项设置导出字段的显式顺序 export_order = ('id', 'price', 'author', 'name')现在已经创建了一个模型资源,我们可以导出到csv文件>>> from app.admin import BookResource >>> dataset = BookResource().export() >>> print(dataset.csv) id,name,author,author_email,imported,published,price,categories 2,Some book,1,,0,2012-12-05,8.85,1定义ModelResource字段时,可以遵循模型关系,class BookResource(resources.ModelResource): class Meta: model = Book # 注意这里是中间是两个下划线,表示链式调用的模型关系 fields = ('author__name',)定义ModelResource属性时,可以遵循模型关系,from import_export.fields import Field class BookResource(resources.ModelResource): ''' 自定义属性时,attribute所对应的值可以是链式调用,author__name实际得到的就是作者的名字, 但是在查询时记得使用select_related(),以保证在查询时可以将所关联的外键数据一块查出,否则无法使用链式调用, 最下面会有完整的例子说明 ''' author_name = Field(attribute='author__name', column_name='作者名字') class Meta: model = Book # fields = () export_order = ('id', 'price', 'author', 'name','author_name')可以覆盖资源字段以更改其某些选项`from import_export.fields import Field class BookResource(resources.ModelResource): published = Field(attribute='published', column_name='published_date') class Meta: model = Book可以添加目标模型中不存在的其他字段from import_export.fields import Field class BookResource(resources.ModelResource): myfield = Field(column_name='myfield',attribute='组织数据时自定义的名字') class Meta: model = Bookimport_export.fields.Field可用的属性:导出时进行高级数据处理:''' 并非所有数据都可以从对象/模型属性中轻松提取。 为了在导出时将复杂的数据模型转换为(通常更简单)的已处理数据结构,dehydrate_<fieldname>应定义方法: ''' from import_export.fields import Field class BookResource(resources.ModelResource): full_title = Field() class Meta: model = Book def dehydrate_full_title(self, book): return '%s by %s' % (book.name, book.author.name)在这种情况下,导出看起来像这样:>>> from app.admin import BookResource >>> dataset = BookResource().export() >>> print(dataset.csv) full_title,id,name,author,author_email,imported,published,price,categories Some book by 1,2,Some book,1,,0,2012-12-05,8.85,1自定义小部件一个ModelResource创建与给定字段类型的默认控件的字段。如果小部件应使用不同的参数初始化,请设置widgets字典。在此示例窗口小部件中,该published字段被覆盖以使用其他日期格式。此格式将同时用于导入和导出资源。class BookResource(resources.ModelResource): class Meta: model = Book widgets = { 'published': {'format': '%d.%m.%Y'}, }应用场景:视图是这样的:渲染上面的视图主要用到了两个表:观看表和分享表class WatchStatistics(models.Model): """ 观看 """ # 支持匿名用户 user = models.ForeignKey(User, null=True) course = models.ForeignKey(VideoInfo, related_name="watch_course") ip = models.CharField(max_length=31) duration = models.DecimalField(decimal_places=2, max_digits=12, default=0.00, null=True) createDate = models.DateTimeField(auto_now_add=True) enterprise = models.ForeignKey(Enterprise, related_name="watch_enterprise") startDate = models.DateTimeField() endDate = models.DateTimeField() type = models.CharField(max_length=50, choices=USER_TYPE_CHOICES, default=REGISTER_USER) class DistributionRelationship(models.Model): """ 分享 """ # 受邀人 invited_user = models.ForeignKey(User, related_name='invited_user', null=True) # 分享人 share_user = models.ForeignKey(User, related_name='share_user', null=True) course = models.ForeignKey("course.VideoInfo", related_name="relationship_course") createDate = models.DateTimeField(auto_now_add=True) updateDate = models.DateTimeField(auto_now=True)难度就在于把两张表数据糅合在一块,并且还需要一些自定义的列,导出excel后端代码:from import_export import resources from import_export import fields from .models import WatchStatistics class WatchStatisticsResource(resources.ModelResource): # attribute所对应的值,中间是两个下划线,链式调用 title = fields.Field(column_name='课程名称', attribute='course__title') user = fields.Field(column_name='用户', attribute='user__owner__name') tel = fields.Field(column_name='电话号码', attribute='user__owner__tel') view_count = fields.Field(column_name='访问次数', attribute='view_count') total_duration = fields.Field(column_name='累计观看时间(分钟)', attribute='total_view_time') endDate = fields.Field(column_name='最后观看时间', attribute='endDate') # share_user 要对应到group_user.share_user share_user = fields.Field(column_name='分享人', attribute='share_user') class Meta: model = WatchStatistics fields = ( ) export_order = ('title', 'user', 'tel', 'view_count', 'total_duration', 'endDate', 'share_user') widgets = { 'endDate': {'format': '%Y-%m-%d %H:%M:%S'}, } @method_decorator(login_required, name='dispatch') class AdminExport(View): resource_model = None redirect_space = None model_class = None datetime_fields = [] search_fields = [] default_filters = {} prefix = "" default_order_sort_field = ['id'] def export(self, request, queryset): content_type = request.GET.get('content_type', 'application/vnd.ms-excel') dataset = self.resource_model().export(queryset=queryset) filename = "%s_%s" % (self.prefix, utils.datetime2string()) if "excel" in content_type: suffix = "xls" elif "csv" in content_type: suffix = "csv" else: messages.error(request, u'导出格式有误!') logger.info("export format error") return redirect(self.redirect_space) content = getattr(dataset, suffix) # # content_type 这里响应对象获得了一个特殊的mime类型,告诉浏览器这是个excel文件不是html response = HttpResponse(content, content_type=content_type) # # 这里响应对象获得了附加的Content-Disposition协议头,它含有excel文件的名称,文件名随意,当浏览器访问它时,会以"另存为"对话框中使用它. response['Content-Disposition'] = 'attachment; filename=%s' % ( '{}.{}'.format(filename, suffix),) return response class WatchStatisticsExport(AdminExport): resource_model = WatchStatisticsResource redirect_space = 'analysis:time' model_class = WatchStatistics prefix = "watchstatistics" datetime_fields = [] search_fields = [] default_filters = {} def get(self, request): course_id = self.request.GET.get('course_id') start_time = self.request.GET.get('start_time') end_time = self.request.GET.get('end_time') watchstatistics_list = WatchStatistics.objects.filter(course=course_id).select_related().order_by('-endDate') if start_time: watchstatistics_list = watchstatistics_list.filter(endDate__gte=start_time) if end_time: watchstatistics_list = watchstatistics_list.filter(endDate__lte=end_time) # 查询出当前课程的分享表 distribution_list = DistributionRelationship.objects.filter(course=course_id).select_related() invited_user_list = [] base_user = OrderedDict() for watch in watchstatistics_list: user = base_user.setdefault(watch.user_id, []) user.insert(0,watch) # 将分享表里受邀人的id所在记录append for dis in distribution_list: # 将拥有受邀人的id记录在列表,加入多条的话,说明同一直播,此人被不同的人邀请进来或者分享人多次访问会造成多条记录 if dis.invited_user.id == watch.user_id: user.append(dis) invited_user_list.append(watch.user_id) watch_records = [] for user_id, users in base_user.items(): # 判断如果有分享的记录,则excel加入邀请人 if not invited_user_list: group_user = users[0] group_user.view_count = len(users) total_view_time = sum([u.duration for u in users]) group_user.total_view_time = total_view_time watch_records.append(group_user) else: # 判断如果学员与受邀人一致,则分开处理 group_user = users[0] if group_user.user.id in invited_user_list: # 同一个人在同一直播被多人邀请过,查找次数 num = invited_user_list.count(group_user.user.id) # 减去分享记录和访问次数 group_user.view_count = len(users)-num total_view_time = sum([u.duration for u in users[:-num]]) group_user.total_view_time = total_view_time share_user = users[-1].share_user.owner.name group_user.share_user =share_user else: group_user.view_count = len(users) total_view_time = sum([u.duration for u in users]) group_user.total_view_time = total_view_time group_user.share_user = '无' watch_records.append(group_user) return self.export(request, queryset=watch_records)效果如图:
 -
jQuery 完整 ajax示例 $(function(){ //请求参数 var list = {}; // $.ajax({ //请求方式 type : "POST", //请求的媒体类型 contentType: "application/json;charset=UTF-8", //请求地址 url : "http://127.0.0.1/admin/list/", //数据,json字符串 data : JSON.stringify(list), //请求成功 success : function(result) { console.log(result); }, //请求失败,包含具体的错误信息 error : function(e){ console.log(e.status); console.log(e.responseText); } }); });
-
HTML打印准考证用JS在html页面实现打印功能 用JS在html页面实现打印功能做项目时,有在网页实现全局和局部打印的需求,百度许久,现总结如下:打印方式一:1.首先在head里面加入下面一段js代码:<script language="javascript"> function preview(fang) { if (fang < 10){ bdhtml=window.document.body.innerHTML;//获取当前页的html代码 sprnstr="<!--startprint"+fang+"-->";//设置打印开始区域 eprnstr="<!--endprint"+fang+"-->";//设置打印结束区域 prnhtml=bdhtml.substring(bdhtml.indexOf(sprnstr)+18); //从开始代码向后取html prnhtml=prnhtml.substring(0,prnhtml.indexOf(eprnstr));//从结束代码向前取html window.document.body.innerHTML=prnhtml; window.print(); window.document.body.innerHTML=bdhtml; } else { window.print(); } } </script>2.然后在所需要打印的代码,用和包围着,如下:<!--startprint1--> <!--打印内容开始--> <div id=wdf> ... </div> <!--打印内容结束--> <!--endprint1-->3.最后加上一个打印的按钮<input type='button' name='button_export' title='打印1' onclick=preview(1) value='打印1'>打印方式二:1.javascript中方法为:<javascript> function dayin(){ var userAgent = navigator.userAgent.toLowerCase(); //取得浏览器的userAgent字符串 if (userAgent.indexOf("trident") > -1){ alert("请使用google或者360浏览器打印"); return false; }else if(userAgent.indexOf('msie')>-1){ var onlyChoseAlert = simpleAlert({ "content":"请使用Google或者360浏览器打印", "buttons":{ "确定":function () { onlyChoseAlert.close(); } } }) alert("请使用google或者360浏览器打印"); return false; }else{//其它浏览器使用lodop var oldstr = document.body.innerHTML; var headstr = "<html><head><title></title></head><body>"; var footstr = "</body>"; //执行隐藏打印区域不需要打印的内容 document.getElementById("otherpho").style.display="none"; //此处id换为你自己的id var printData = document.getElementById("printdivaa").innerHTML; //获得 div 里的所有 html 数据 document.body.innerHTML = headstr+printData+footstr; window.print(); //打印结束后,放开隐藏内容 document.getElementById("otherpho").style.display="block"; document.body.innerHTML = oldstr ; } } </javascript>2.页面内容如下: ... <!--打印内容开始--> <div id='printdivaa'> ... </div> <!--打印内容结束--> ...3.页面中放置一个打印按钮:<button type="button" class="btn_search" onclick="dayin()">打印</button>打印方式三(此方式会重新打开一个浏览器窗口):1.javascript中方法为: //打印操作 function print() { var userAgent = navigator.userAgent.toLowerCase(); //取得浏览器的userAgent字符串 if (userAgent.indexOf("trident") > -1) { alert("请使用google或者360浏览器打印"); return false; } else if (userAgent.indexOf('msie') > -1) { var onlyChoseAlert = simpleAlert({ "content" : "请使用Google或者360浏览器打印", "buttons" : { "确定" : function() { onlyChoseAlert.close(); } } }) alert("请使用google或者360浏览器打印"); return false; } else {//其它浏览器使用lodop var oldstr = document.body.innerHTML; var headstr = "<html><head><title></title></head><body>"; var footstr = "</body></html>"; //执行隐藏打印区域不需要打印的内容 document.getElementById("otherpho").style.display="none"; var printData = document.getElementById("studentPhoTable").innerHTML; //获得 div 里的所有 html 数据 var wind = window.open("", "newwin", "toolbar=no,scrollbars=yes,menubar=no"); wind.document.body.innerHTML = headstr + printData + footstr; wind.print(); //打印结束后,放开隐藏内容 document.getElementById("otherpho").style.display="block"; wind.close(); window.document.body.innerHTML = oldstr; } } </script>2.页面内容如下: ... <!--打印内容开始--> <div id='studentPhoTable'> ... </div> <!--打印内容结束--> ...3.页面中放置一个打印按钮:<input type="button" onclick="print()" value="确定打印" />
-
-
Apscheduler时间调度程序——python定时任务 1.简介APScheduler的全称是Advanced Python Scheduler。它是一个轻量级的 Python 定时任务调度框架。APScheduler 支持三种调度任务:固定时间间隔,固定时间点(日期),Linux 下的 Crontab 命令。同时,它还支持异步执行、后台执行调度任务。2. 安装 pip install APScheduler3. 基础组件APScheduler 有四种组件,分别是:调度器(scheduler),作业存储(job store),触发器(trigger),执行器(executor)。schedulers(调度器)它是任务调度器,属于控制器角色。它配置作业存储器和执行器可以在调度器中完成,例如添加、修改和移除作业。triggers(触发器)描述调度任务被触发的条件。不过触发器完全是无状态的。job stores(作业存储器)任务持久化仓库,默认保存任务在内存中,也可将任务保存都各种数据库中,任务中的数据序列化后保存到持久化数据库,从数据库加载后又反序列化。executors(执行器)负责处理作业的运行,它们通常通过在作业中提交指定的可调用对象到一个线程或者进城池来进行。当作业完成时,执行器将会通知调度器。""" date 触发器使用示例如下: date 触发器指在某一指定时间下执行脚本的方法 """ from datetime import datetime from datetime import date from apscheduler.schedulers.background import BackgroundScheduler def job_func(text): print(text) scheduler = BackgroundScheduler() # 在 2017-12-13 时刻运行一次 job_func 方法 scheduler .add_job(job_func, 'date', run_date=date(2017, 12, 13), args=['text']) # 在 2017-12-13 14:00:00 时刻运行一次 job_func 方法 scheduler .add_job(job_func, 'date', run_date=datetime(2017, 12, 13, 14, 0, 0), args=['text']) # 在 2017-12-13 14:00:01 时刻运行一次 job_func 方法 scheduler .add_job(job_func, 'date', run_date='2017-12-13 14:00:01', args=['text']) scheduler.start()""" interval 触发器 循环执行脚本任务的触发器 weeks (int) – 间隔几周 days (int) – 间隔几天 hours (int) – 间隔几小时 minutes (int) – 间隔几分钟 seconds (int) – 间隔多少秒 start_date (datetime|str) – 开始日期 end_date (datetime|str) – 结束日期 timezone (datetime.tzinfo|str) – 时区 """ import datetime from apscheduler.schedulers.background import BackgroundScheduler def job_func(text): print(datetime.datetime.utcnow().strftime("%Y-%m-%d %H:%M:%S.%f")[:-3]) scheduler = BackgroundScheduler() # 每隔两分钟执行一次 job_func 方法 scheduler .add_job(job_func, 'interval', minutes=2) # 在 2017-12-13 14:00:01 ~ 2017-12-13 14:00:10 之间, 每隔两分钟执行一次 job_func 方法 scheduler .add_job(job_func, 'interval', minutes=2, start_date='2017-12-13 14:00:01' , end_date='2017-12-13 14:00:10') scheduler.start()""" cron 触发器使用示例如下: 指定指定时间循环执行脚本的触发器 year (int|str) – 年,4位数字 month (int|str) – 月 (范围1-12) day (int|str) – 日 (范围1-31) week (int|str) – 周 (范围1-53) day_of_week (int|str) – 周内第几天或者星期几 (范围0-6 或者 mon,tue,wed,thu,fri,sat,sun) hour (int|str) – 时 (范围0-23) minute (int|str) – 分 (范围0-59) second (int|str) – 秒 (范围0-59) start_date (datetime|str) – 最早开始日期(包含) end_date (datetime|str) – 最晚结束时间(包含) timezone (datetime.tzinfo|str) – 指定时区 """ import datetime from apscheduler.schedulers.background import BackgroundScheduler def job_func(text): print("当前时间:", datetime.datetime.utcnow().strftime("%Y-%m-%d %H:%M:%S.%f")[:-3]) scheduler = BackgroundScheduler() # 在每年 1-3、7-9 月份中的每个星期一、二中的 00:00, 01:00, 02:00 和 03:00 执行 job_func 任务 scheduler .add_job(job_func, 'cron', month='1-3,7-9',day='0, tue', hour='0-3') scheduler.start()参考链接:https://www.cnblogs.com/luxiaojun/p/6567132.html参考链接:https://www.cnblogs.com/ohyb/p/9084011.html参考链接:https://www.cnblogs.com/cool-fire/p/7449758.html参考链接:http://www.cnblogs.com/luxiaojun/p/6567132.html官方文档:https://apscheduler.readthedocs.io/en/latest/userguide.html#basic-concepts
-
使程序在Linux下后台运行 一、为什么要使程序在后台执行我们计算的程序都是周期很长的,通常要几个小时甚至一个星期。我们用的环境是用putty远程连接到日本Linux服务器。所以使程序在后台跑有以下三个好处:1:我们这边是否关机不影响日本那边的程序运行。(不会像以前那样,我们这网络一断开,或一关机,程序就断掉或找不到数据,跑了几天的程序只能重头再来,很是烦恼)2:不影响计算效率2:让程序在后台跑后,不会占据终端,我们可以用终端做别的事情。二、怎么样使程序在后台执行方法有很多,这里主要列举两种。假如我们有程序pso.cpp,通过编译后产生可执行文件pso,我们要使pso在linux服务器后台执行。当客户端关机后重新登入服务器后继续查看本来在终端输出的运行结果。(假设操作都在当前目录下)方法1在终端输入命令: # ./pso > pso.file 2>&1 & 解释:将pso直接放在后台运行,并把终端输出存放在当前目录下的pso.file文件中。 当客户端关机后重新登陆服务器后,直接查看pso.file文件就可看执行结果(命令:#cat pso.file )。 方法2在终端输入命令:# nohup ./pso > pso.file 2>&1 &解释:nohup就是不挂起的意思,将pso直接放在后台运行,并把终端输出存放在当前目录下的pso.file文件中。当客户端关机后重新登陆服务器后,直接查看pso.file文件就可看执行结果(命令:#cat pso.file )。三、常用任务管理命令# jobs //查看任务,返回任务编号n和进程号# bg %n //将编号为n的任务转后台运行# fg %n //将编号为n的任务转前台运行# ctrl+z //挂起当前任务# ctrl+c //结束当前任务 注:如果要使在前天执行任务放到后台运行,则先要用ctrl+z挂起该任务,然后用bg使之后台执行。 附: 在Linux中,如果要让进程在后台运行,一般情况下,我们在命令后面加上&即可,实际上,这样是将命令放入到一个作业队列中了:$ ./test.sh & [1] 17208 $ jobs -l [1]+ 17208 Running ./test.sh &对于已经在前台执行的命令,也可以重新放到后台执行,首先按ctrl+z暂停已经运行的进程,然后使用bg命令将停止的作业放到后台运行:$ ./test.sh [1]+ Stopped ./test.sh $ bg %1 [1]+ ./test.sh & $ jobs -l [1]+ 22794 Running ./test.sh &但是如上方到后台执行的进程,其父进程还是当前终端shell的进程,而一旦父进程退出,则会发送hangup信号给所有子进程,子进程收到hangup以后也会退出。如果我们要在退出shell的时候继续运行进程,则需要使用nohup忽略hangup信号,或者setsid将将父进程设为init进程(进程号为1)$ echo $$ 21734 $ nohup ./test.sh & [1] 29016 $ ps -ef | grep test 515 29710 21734 0 11:47 pts/12 00:00:00 /bin/sh ./test.sh 515 29713 21734 0 11:47 pts/12 00:00:00 grep test$ setsid ./test.sh & [1] 409 $ ps -ef | grep test 515 410 1 0 11:49 ? 00:00:00 /bin/sh ./test.sh 515 413 21734 0 11:49 pts/12 00:00:00 grep test上面的试验演示了使用nohup/setsid加上&使进程在后台运行,同时不受当前shell退出的影响。那么对于已经在后台运行的进程,该怎么办呢?可以使用disown命令:$ ./test.sh & [1] 2539 $ jobs -l [1]+ 2539 Running ./test.sh & $ disown -h %1 $ ps -ef | grep test 515 410 1 0 11:49 ? 00:00:00 /bin/sh ./test.sh 515 2542 21734 0 11:52 pts/12 00:00:00 grep test另外还有一种方法,即使将进程在一个subshell中执行,其实这和setsid异曲同工。方法很简单,将命令用括号() 括起来即可:$ (./test.sh &) $ ps -ef | grep test 515 410 1 0 11:49 ? 00:00:00 /bin/sh ./test.sh 515 12483 21734 0 11:59 pts/12 00:00:00 grep test注:本文试验环境为Red Hat Enterprise Linux AS release 4 (Nahant Update 5),shell为/bin/bash,不同的OS和shell可能命令有些不一样。例如AIX的ksh,没有disown,但是可以使用nohup -p PID来获得disown同样的效果。还有一种更加强大的方式是使用screen,首先创建一个断开模式的虚拟终端,然后用-r选项重新连接这个虚拟终端,在其中执行的任何命令,都能达到nohup的效果,这在有多个命令需要在后台连续执行的时候比较方便:$ screen -dmS screen_test $ screen -list There is a screen on: 27963.screen_test (Detached) 1 Socket in /tmp/uscreens/S-jiangfeng. $ screen -r screen_test
-
Burpsuite2.1中文版安装步骤 下载地址:https://gitlab.com/Vastsa/lanpicbed/-/raw/master/post/9.html一、安装Burpsuite(1)工具运行需要Java环境,请自行安装,此处不赘述。解压完成后打开文件夹,双击运行这个文件burp-loader-keygen-2_1_05-Jaky.jar (2)点击Run启动Burpsuite(3)打开Burpsuite成功(4)然后将Keygen中License复制(CTRL+C)粘贴(CTRL+V)到Burp Suite中,然后点击Next(下一步)(5)然后点击Manual activation(6)点击Copy request(7)点击Copy request,复制完成之后,将字符串粘贴到keygen的Activation Request框里,然后Activation Response框里就有了结果,如下(8)复制完后,将字符串粘贴到BurpSuite剩下的那个框里,如图,然后再点击Next(9)显示激活成功,然后点击Finish(10)然后点击Next(11)再点击Start Burp(12)进入Burpsuite主界面二、启动汉化版Burpsuite (1)注册安装完之后我们点击左上角的Burp→Exit→Yes 退出Burpsuite(2)退出后,找到文件夹下的vbs文件,然后双击启动汉化版的Burpsuite(3)进入汉化版的Burpsuite主界面